Solr is a scalable, ready to deploy, search/storage engine optimized to search large volumes of text-centric data. Solr is enterprise-ready, fast and highly scalable.
Solr is an open-source search platform which is used to build search applications. It was built on top of Lucene (full text search engine). Solr is enterprise-ready, fast and highly scalable. The applications built using Solr are sophisticated and deliver high performance.
It was Yonik Seely who created Solr in 2004 in order to add search capabilities to the company website of CNET Networks. In Jan 2006, it was made an open-source project under Apache Software Foundation. Its latest version, Solr 6.0, was released in 2016 with support for execution of parallel SQL queries.
Solr can be used along with Hadoop. As Hadoop handles a large amount of data, Solr helps us in finding the required information from such a large source. Not only search, Solr can also be used for storage purpose. Like other NoSQL databases, it is a non-relational data storage and processing technology.
In short, Solr is a scalable, ready to deploy, search/storage engine optimized to search large volumes of text-centric data.
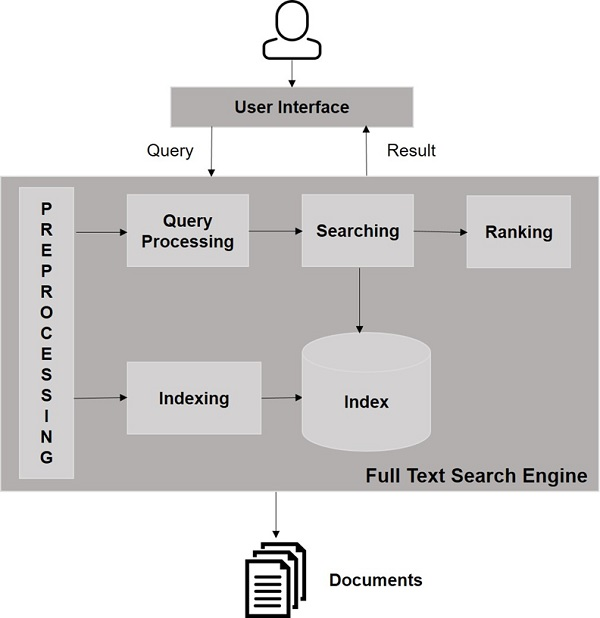
Lucene is simple yet powerful Java-based search library. It can be used in any application to add search capability. Lucene is a scalable and high-performance library used to index and search virtually any kind of text. Lucene library provides the core operations which are required by any search application, such as Indexing and Searching.
Any search application is required to perform some or all of the following operations.
Step | Title | Description |
1 | Acquire Raw Content | The very first step of any search application is to collect the target contents on which search is to be conducted. |
2 | Build the document | The next step is to build the document(s) from the raw contents which the search application can understand and interpret easily. |
3 | Analyze the document | Before indexing can start, the document is to be analyzed. |
4 | Indexing the document | Once the documents are built and analyzed, the next step is to index them so that this document can be retrieved based on certain keys, instead of the whole contents of the document. Indexing is similar to the indexes that we have at the end of a book where common words are shown with their page numbers so that these words can be tracked quickly, instead of searching the complete book. |
5 | User Interface for Search | Once a database of indexes is ready, then the application can perform search operations. To help the user make a search, the application must provide a user interface where the user can enter text and initiate the search process |
6 | Build Query | Once the user makes a request to search a text, the application should prepare a query object using that text, which can then be used to inquire the index database to get relevant details. |
7 | Search Query | Using the query object, the index database is checked to get the relevant details and the content documents. |
8 | Render Results | Once the required result is received, the application should decide how to display the results to the user using its User Interface. |
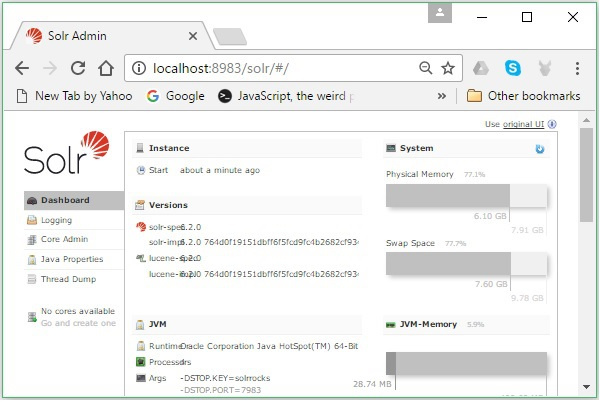
http://localhost:8983/
If the installation process is successful, then you will get to see the dashboard of the Apache Solr user interface as shown below.
The following is a list of general terms that are used across all types of Solr setups −
In an earlier chapter, we discussed how to install Apache Solr in standalone mode. Note that we can also install Solr in distributed mode (cloud environment) where Solr is installed in a master-slave pattern. In distributed mode, the index is created on the master server and it is replicated to one or more slave servers.
The key terms associated with Solr Cloud are as follows −
The main configuration files in Apache Solr are as follows −
After installing Solr, browse to the bin folder in Solr home directory and start Solr using the following command.
This command starts Solr in the background, listening on port 8983 by displaying the following message.
If you start Solr using the start command, then Solr will start in the background. Instead, you can start Solr in the foreground using the –f option.
Using –p option of the start command, we can start Solr in another port, as shown in the following code block.
You can stop Solr using the stop command.
This command stops Solr, displaying a message as shown below.
The restart command of Solr stops Solr for 5 seconds and starts it again. You can restart Solr using the following command −
This command restarts Solr, displaying the following message −
The help command of Solr can be used to check the usage of the Solr prompt and its options.
This status command of Solr can be used to search and find out the running Solr instances on your computer. It can provide you information about a Solr instance such as its version, memory usage, etc.
You can check the status of a Solr instance, using the status command as follows −
On executing, the above command displays the status of Solr as follows −
A Solr Core is a running instance of a Lucene index that contains all the Solr configuration files required to use it. We need to create a Solr Core to perform operations like indexing and analyzing.
A Solr application may contain one or multiple cores. If necessary, two cores in a Solr application can communicate with each other.
One way to create a core is to create a schema-less core using the create command, as shown below −
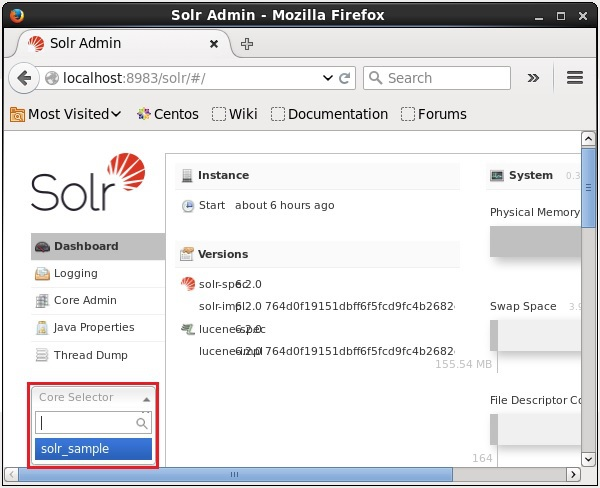
Here, we are trying to create a core named Solr_sample in Apache Solr. This command creates a core displaying the following message.
You can see a core selector where you can select the newly created core
Alternatively, you can create a core using the create_core command. This command has the following options −
–c core_name | Name of the core you wanted to create |
-p port_name | Port at which you want to create the core |
-d conf_dir | Configuration directory of the port |
Let’s see how you can use the create_core command. Here, we will try to create a core named my_core.
On executing, the above command creates a core displaying the following message −
You can delete this core using the delete command by passing the name of the core to this command as follows −
On executing the above command, the specified core will be deleted displaying the following message.
In Apache Solr, we can index (add, delete, modify) various document formats such as xml, csv, pdf, etc. We can add data to Solr index in several ways.
In this chapter, we are going to discuss indexing −
In this chapter, we will discuss how to add data to the index of Apache Solr using various interfaces (command line, web interface, and Java client API)
Solr has a post command in its bin/ directory. Using this command, you can index various formats of files such as JSON, XML, CSV in Apache Solr.
Browse through the bin directory of Apache Solr and execute the –h option of the post command, as shown in the following code block.
On executing the above command, you will get a list of options of the post command, as shown below.
Suppose we have a file named sample.csv with the following content (in the bin directory).
Student ID | First Name | Last Name | Phone | City |
001 | Mukesh | Kumar | 7678526315 | Delhi |
002 | Siddharth | Bhattacharya | 9848022338 | Kolkata |
003 | Rajesh | Khanna | 9848022339 | Patna |
http://localhost:8983/
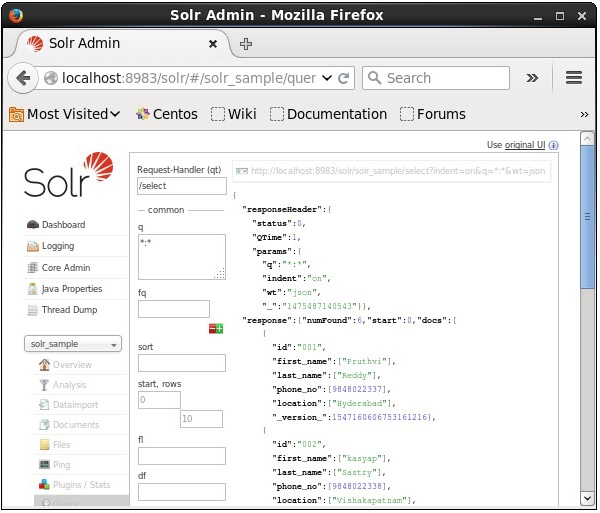
Select the core Solr_sample. By default, the request handler is /select and the query is “:”. Without doing any modifications, click the ExecuteQuery button at the bottom of the page.
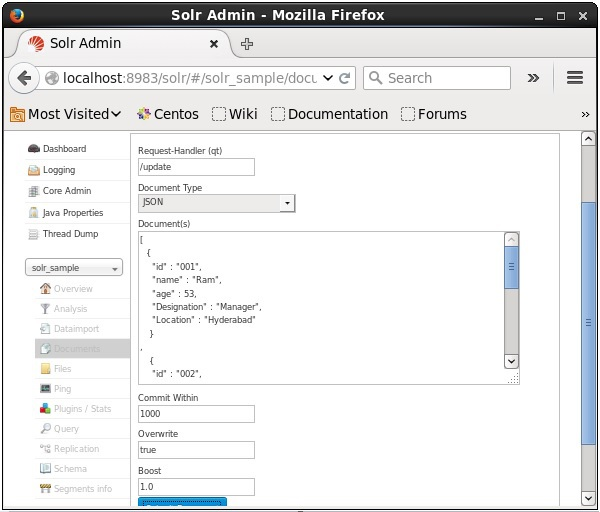
You can also index documents using the web interface provided by Solr. Let us see how to index the following JSON document.
Open Solr web interface using the following URL −
http://localhost:8983/
Step 2
Select the core Solr_sample. By default, the values of the fields Request Handler, Common Within, Overwrite, and Boost are /update, 1000, true, and 1.0 respectively, as shown in the following screenshot.
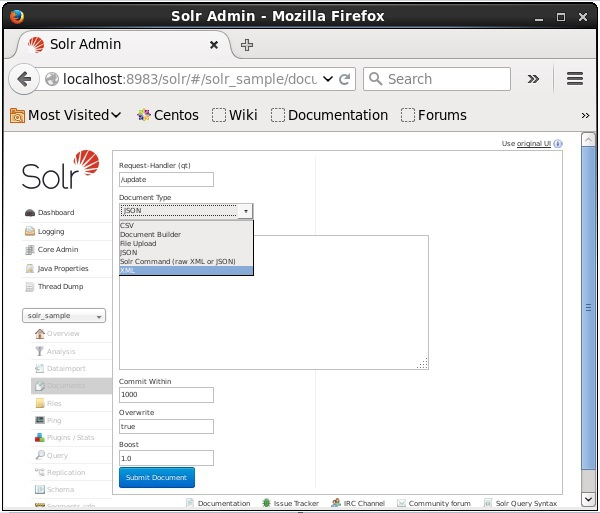
Now, choose the document format you want from JSON, CSV, XML, etc. Type the document to be indexed in the text area and click the Submit Document button, as shown in the following screenshot.
Following is the XML file used to update a field in the existing document. Save this in a file with the name update.xml.
As you can observe, the XML file written to update data is just like the one which we use to add documents. But the only difference is we use the update attribute of the field.
In our example, we will use the above document and try to update the fields of the document with the id 001.
Suppose the XML document exists in the bin directory of Solr. Since we are updating the index which exists in the core named my_core, you can update using the post tool as follows −
On executing the above command, you will get the following output.
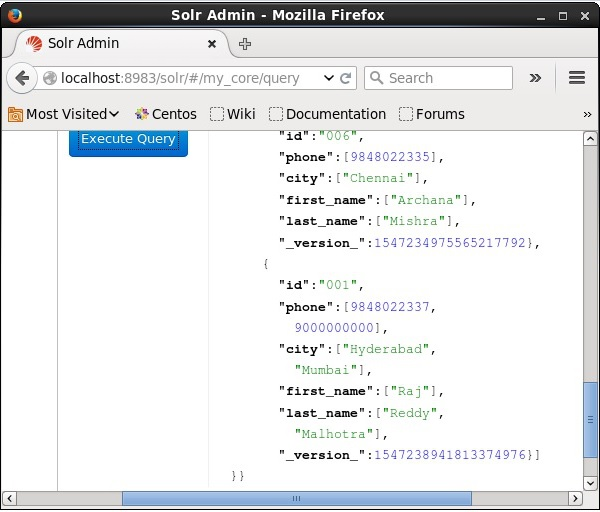
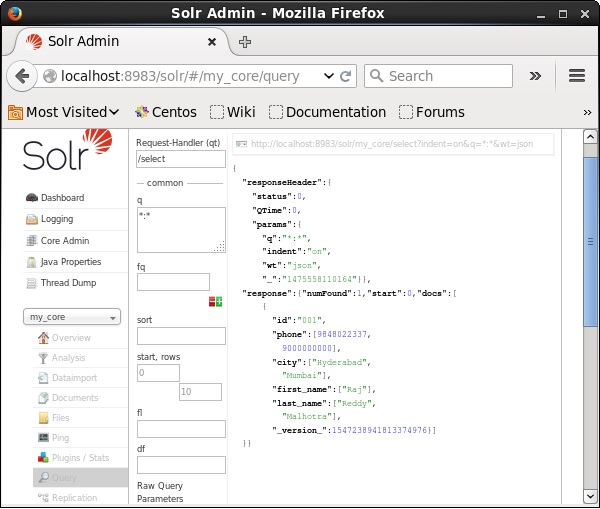
Visit the homepage of Apache Solr web interface and select the core as my_core. Try to retrieve all the documents by passing the query “:” in the text area q and execute the query. On executing, you can observe that the document is updated.
To delete documents from the index of Apache Solr, we need to specify the ID’s of the documents to be deleted between the <delete></delete> tags.
Here, this XML code is used to delete the documents with ID’s 003 and 005. Save this code in a file with the name delete.xml.
If you want to delete the documents from the index which belongs to the core named my_core, then you can post the delete.xml file using the post tool, as shown below.
On executing the above command, you will get the following output.
Visit the homepage of the of Apache Solr web interface and select the core as my_core. Try to retrieve all the documents by passing the query “:” in the text area q and execute the query. On executing, you can observe that the specified documents are deleted.
Sometimes we need to delete documents based on fields other than ID. For example, we may have to delete the documents where the city is Chennai.
In such cases, you need to specify the name and value of the field within the <query></query> tag pair.
Save it as delete_field.xml and perform the delete operation on the core named my_core using the post tool of Solr.
On executing the above command, it produces the following output.
Visit the homepage of the of Apache Solr web interface and select the core as my_core. Try to retrieve all the documents by passing the query “:” in the text area q and execute the query. On executing, you can observe that the documents containing the specified field value pair are deleted.
Just like deleting a specific field, if you want to delete all the documents from an index, you just need to pass the symbol “:” between the tags <query></ query>, as shown below.
Save it as delete_all.xml and perform the delete operation on the core named my_core using the post tool of Solr.
On executing the above command, it produces the following output.
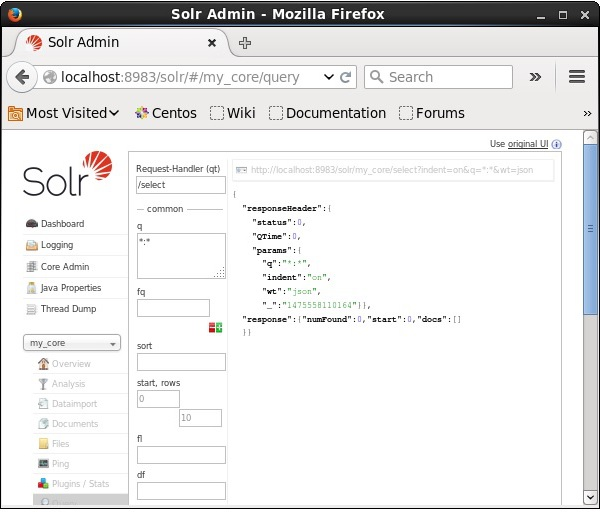
Visit the homepage of Apache Solr web interface and select the core as my_core. Try to retrieve all the documents by passing the query “:” in the text area q and execute the query. On executing, you can observe that the documents containing the specified field value pair are deleted.
In this chapter, we will discuss how to retrieve data using Java Client API. Suppose we have a .csv document named sample.csv with the following content.
You can index this data under the core named sample_Solr using the post command.
n addition to storing data, Apache Solr also provides the facility of querying it back as and when required. Solr provides certain parameters using which we can query the data stored in it.
In the following table, we have listed down the various query parameters available in Apache Solr.
Parameter | Description |
q | This is the main query parameter of Apache Solr, documents are scored by their similarity to terms in this parameter. |
fq | This parameter represents the filter query of Apache Solr the restricts the result set to documents matching this filter. |
start | The start parameter represents the starting offsets for a page results the default value of this parameter is 0. |
rows | This parameter represents the number of the documents that are to be retrieved per page. The default value of this parameter is 10. |
sort | This parameter specifies the list of fields, separated by commas, based on which the results of the query is to be sorted. |
fl | This parameter specifies the list of the fields to return for each document in the result set. |
wt | This parameter represents the type of the response writer we wanted to view the result. |
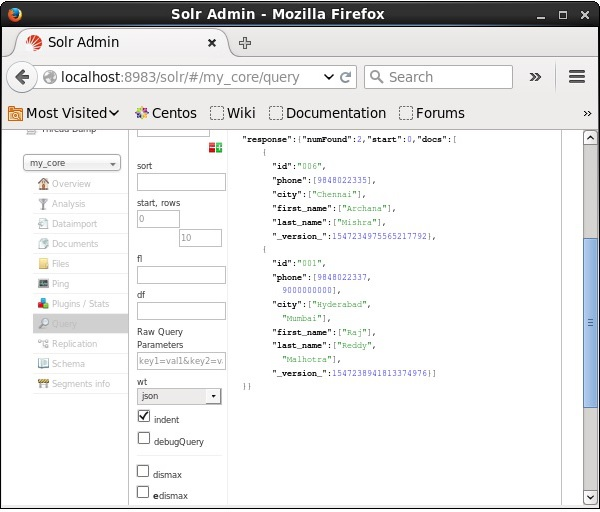
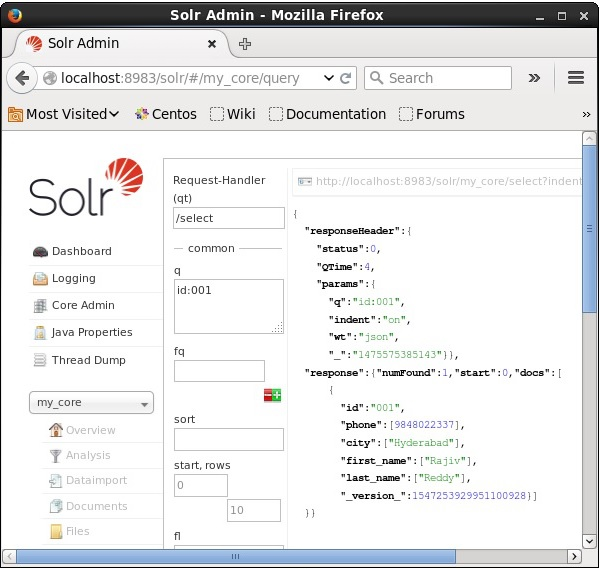
You can see all these parameters as options to query Apache Solr. Visit the homepage of Apache Solr. On the left-hand side of the page, click on the option Query. Here, you can see the fields for the parameters of a query.
We can retrieve the records from the second record by passing 2 as a value to the parameter start, as shown in the following screenshot.

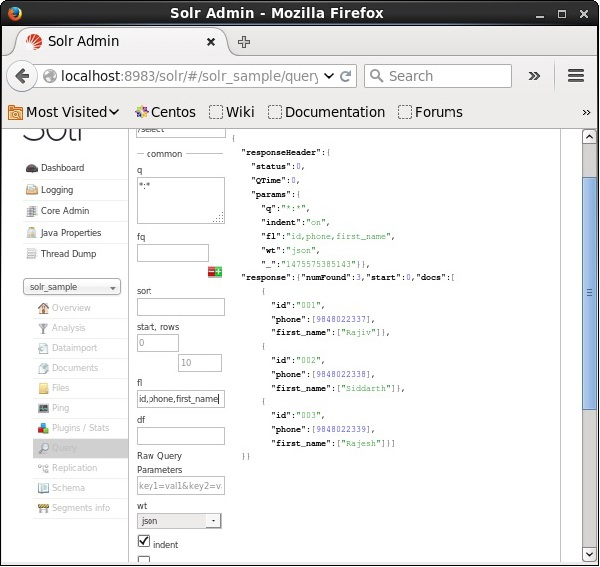
If we want to have particular fields in the resulted documents, we need to pass the list of the required fields, separated by commas, as a value to the property fl.
In the following example, we are trying to retrieve the fields − id, phone, and first_name.
Faceting in Apache Solr refers to the classification of the search results into various categories. In this chapter, we will discuss the types of faceting available in Apache Solr −
Faceting commands are added to any normal Solr query request, and the faceting counts come back in the same query response.
Using the field faceting, we can retrieve the counts for all terms, or just the top terms in any given field.
As an example, let us consider the following books.csv file that contains data about various books.
Let us post this file into Apache Solr using the post tool.
On executing the above command, all the documents mentioned in the given .csv file will be uploaded into Apache Solr.
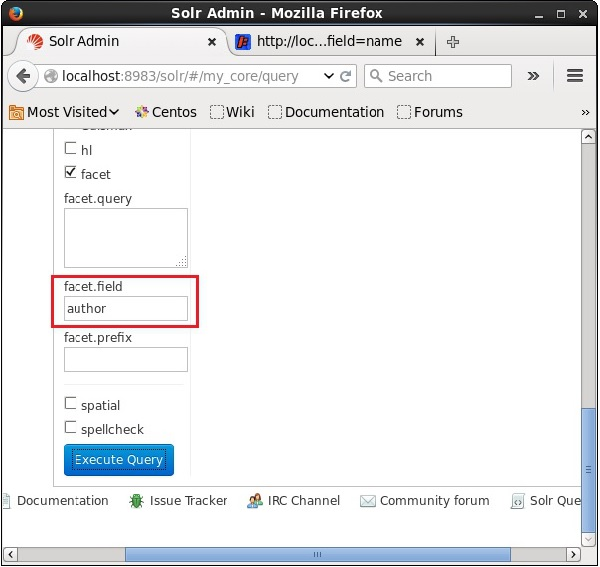
Now let us execute a faceted query on the field author with 0 rows on the collection/core my_core.
Open the web UI of Apache Solr and on the left-hand side of the page, check the checkbox facet, as shown in the following screenshot.
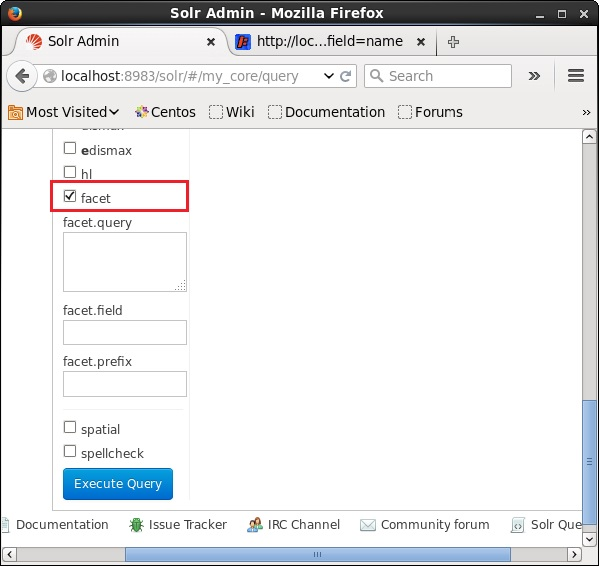
On checking the checkbox, you will have three more text fields in order to pass the parameters of the facet search. Now, as parameters of the query, pass the following values.
On executing, it will produce the following result.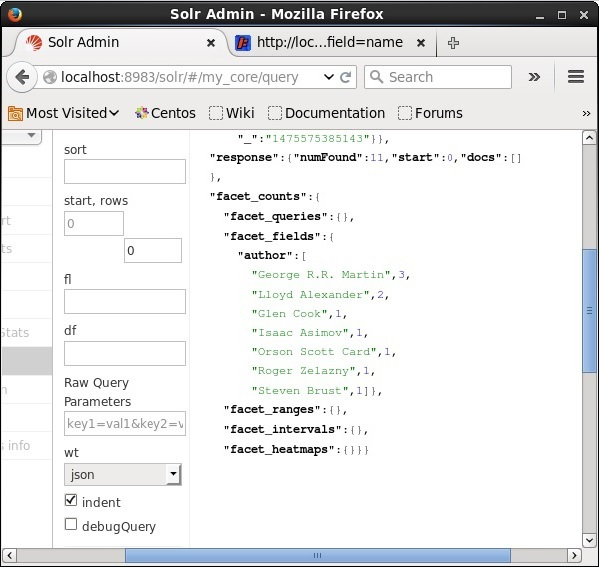
Referred from tutorials point


poloniex clone script A Poloniex clone script is a ready-made cryptocurrency exchange software developed using the existing features and functions o

When it comes to preparing for the NIFT (National Institute of Fashion Technology) entrance exam in Kolkata, there are several coaching institutes tha

P2E Game development is becoming more trendy and anyone can create their own play to earn games for their business. A decentralized gaming industry ca

HTML is the standard code used to make most web pages and web apps. But like most programming languages, there’s a steep learning curve, especially if

67 followers

This is one of the most confusing java interview question asked many a times to java freshers. Most of time, this question has been asked to java fres

411 followers

Metaverse is the virtual space where people can work, study, earn money, communicate and have fun. In the metaverse, everyone can create their own ava

The scope of civil engineers has been rising from the past few years and there have been many job opportunities available for this position. It has be

17 followers

Full stack web development refers to the practice of developing both the front-end and back-end components of a web application. It involves working w

214 followers


 Copy Link